アクセストークン
情報:詳細はこちらをご確認ください。
アクセストークンの取得
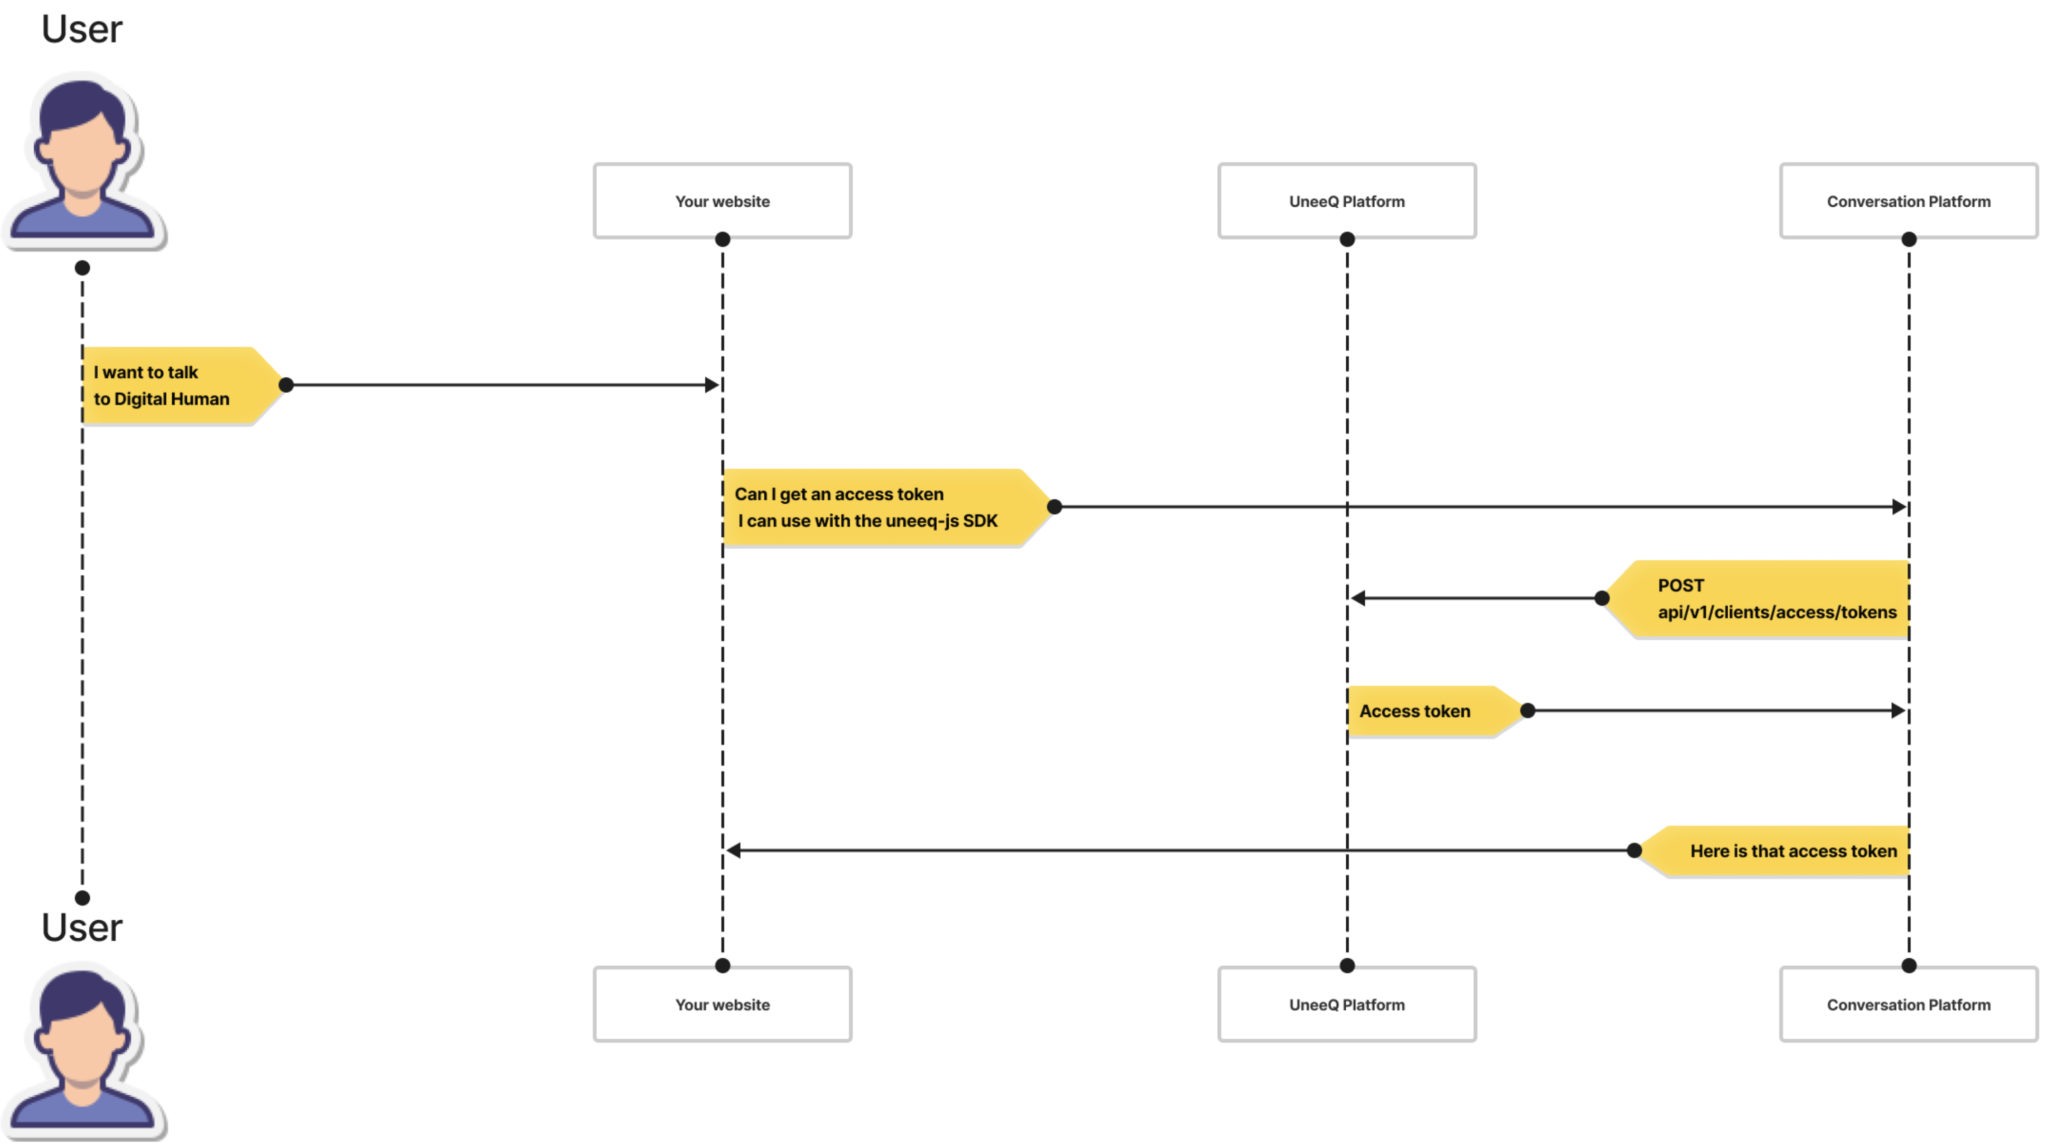
デジタルヒューマンとの会話セッションを開始するには、アプリケーションはまず、ウェブサイトとuneeq-js SDKがデジタルヒューマンプラットフォームを認証するために使用する1回限りのアクセストークンを取得する必要があります。

アプリ例
UneeQ API サーバーによって生成された単一の使用トークンを返す Node アプリケーションの例をチェックしてみましょう。
カスタマーJWT トークン
トークンを取得するためのプロセスでは、JWT暗号化(クライアント側)とJWT復号化(UneeQサーバ側)が必要です。これを実現するためには、双方が共有のJWT秘密を保有している必要があります。このJWTシークレットはカスタマーサクセスチームから提供します。
接続URL
Region | 接続URL |
North America | https://api.us.uneeq.io |
Europe | https://api.eu.uneeq.io |
Oceania | https://api.au.uneeq.io |
Japan | 準備中 |
リクエスト仕様
アクセストークンを取得するには、以下のリクエストフォーマットを使用して、/api/v1/clients/access/tokensにPOSTリクエストを送信します。
リクエストヘッダ
Key | Type | Value |
Content-Type | String | application/jwt |
workspace | String | workspaceId は、会話を開始したい Persona を識別する ID です。PersonaId は、UneeQ Creator の Personas エリアで確認できます。それ以外の場合は、カスタマー サクセス チームがこの ID を提供します。 |
リクエストボディ
このペイロードは、顧客の JWT トークンを使用して暗号化する必要があります。
Field | Type | Description |
sid | String | あなたが定義した値で、あなた自身のプラットフォームでこの会話セッションを識別するのに役立ちます。空文字列にすることもできます。 |
fm-custom-data | String | オプションです。プラットフォームからの後続のリクエストで送信するアドホックな値を指定します。文字列化された JSON である必要があります。 |
fm-workspace | String | workspaceId は、会話を開始したい Persona を識別する ID です。PersonaId は、UneeQ Creator の Personas エリアで確認できます。それ以外の場合は、カスタマー サクセス チームがこの ID を提供します。 |
//Node.jsサンプル

// Region Url as defined above, example is for US region
const regionUrl = "https://api.us.uneeq.io";

// Any custom data you want to be provided to your NLP
const customData = {};

// customerUneeqSecret can be retrieved from the deploy section of Creator or provided by customer success team
const customerUneeqSecret = "[Your JWT Secret]";

// Persona ID, retreived from Creator, or provided by customer success team
const personaId = "[ENTER_YOUR_PERSONA_ID]"

// Build the JWT payload, signed with the customers secret
const body = jwt.sign(
    {
        sid: 'SESSION-ID',
        'fm-workspace': personaId,
        'fm-custom-data': JSON.stringify(customData)
    },
    customerUneeqSecret /* The body must be signed as JWT with customers secret */
);

// Perform the request
fetch(regionUrl + "/api/v1/clients/access/tokens", {
    "method": "POST",
    "headers": {
        "Content-Type": "application/jwt",
        "workspace": personaId
    },
    "body": body
})
    .then(response => {
        console.log(response.token);
    })
    .catch(err => {
        console.error(err);
    });
## Pythonサンプル

## The following is a full Flask application in Python
## This microservice can be hosted to return a valid token to start a digital human session
## If you ran this service as- is, your front - end would make a token request to http://your-domain.com/api/v1/token

from flask import Flask, request, jsonify
import requests
    from flask_cors import CORS
import jwt

app = Flask(__name__)
app.config["DEBUG"] = True
CORS(app) # This setting will add 'Access-Control-Allow-Origin': '*' header to the response, important if your token service is running on a separate domain from your digital human front - end application

jwt_secret = '[Your JWT Secret]' # Your JWT Secret
customData = {} # Any custom data you want returned in fm - custom - data object
api_url = 'https://api.us.uneeq.io' # The correct regional endpoint for your account
personaId = '[ENTER_YOUR_PERSONA_ID]' # The Persona ID for your digital human

def jwt_encryption():
message = {
    'sid': 'SESSION-ID', # Can be any value you wish
'fm-workspace': personaId,
    'fm-custom-data': json.dumps(customData, separators = (',', ':'), ensure_ascii = False) # You can simply `json.dumps({})` for simplicity
}
compact_jws = jwt.encode(message, jwt_secret, algorithm = 'HS256') # Algorithm is very importantly HS256, not RS256
return compact_jws

@app.route('/api/v1/token', methods = ['POST', 'GET'])
def get_access_token():
compact_jws = jwt_encryption()
headers = { "Content-Type": "application/jwt", "workspace": personaId }
r = requests.post(api_url + "/api/v1/clients/access/tokens", data = compact_jws, headers = headers)
r = r.json()
return r

if __name__ == "__main__":
    print('running')
app.run(host = '127.0.0.1', port = 5000)
#Rybyサンプル

require 'jwt'
include HTTParty

# This example initializes global variables with static values, in a real implementation, you should use environment variables passed into your application.
# Never hardcode any sensitive credentials into a production application.
# You will need to merge the sample code below into a proper Ruby Class or if you are using Ruby on Rails, an appropriate Rails location such as a controller
$persona_id = '[ENTER_YOUR_PERSONA_ID]' # Replace value with your Persona ID from within UneeQ Creator
$api_endpoint_url = 'https://api.us.uneeq.io' # Replace with other region if your account is provisioned outside the US
$customer_jwt_secret = '[Your JWT Secret]' # Replace value with your JWT Secret, which you can find within your UneeQ Creator portal

def authenticate_to_uneeq
response = HTTParty.post(
"#{$api_endpoint_url}/api/v1/clients/access/tokens",
headers: { "Content-Type": 'application/jwt', "workspace": $persona_id },
body: encode_payload
)

return response
end

def encode_payload
payload = {
'sid' => 'RANDOM SESSION ID VALUE',
'fm-custom-data' => JSON.generate({}), # Put whatever key-value pairs you'd like and they will be returned from UneeQ on each request to your NLP layer in fm-custom-data
'fm-workspace' => $persona_id
}

token = JWT.encode payload, $customer_jwt_secret, 'HS256'
end
応答フォーマット指定
レスポンスは、コンテンツタイプがapplication/jsonのJSONです。
Code | Status | Response |
200 | OK | { "token": SINGLE_USE_TOKEN } |
400 | Bad Request | { "error": ERROR_DESCRIPTION } |
401 | Unauthorized | { "error": ERROR_DESCRIPTION } |
403 | Forbidden | { "error": ERROR_DESCRIPTION } |
500 | Server Error | { "error": ERROR_DESCRIPTION } |
トークンの値は uneeq-js SDK がデジタルヒューマンとの会話セッションをインスタンス化するために使用することができます。
お役に立ちましたか?
😞
😐
🤩
最終更新日 June 17, 2023
